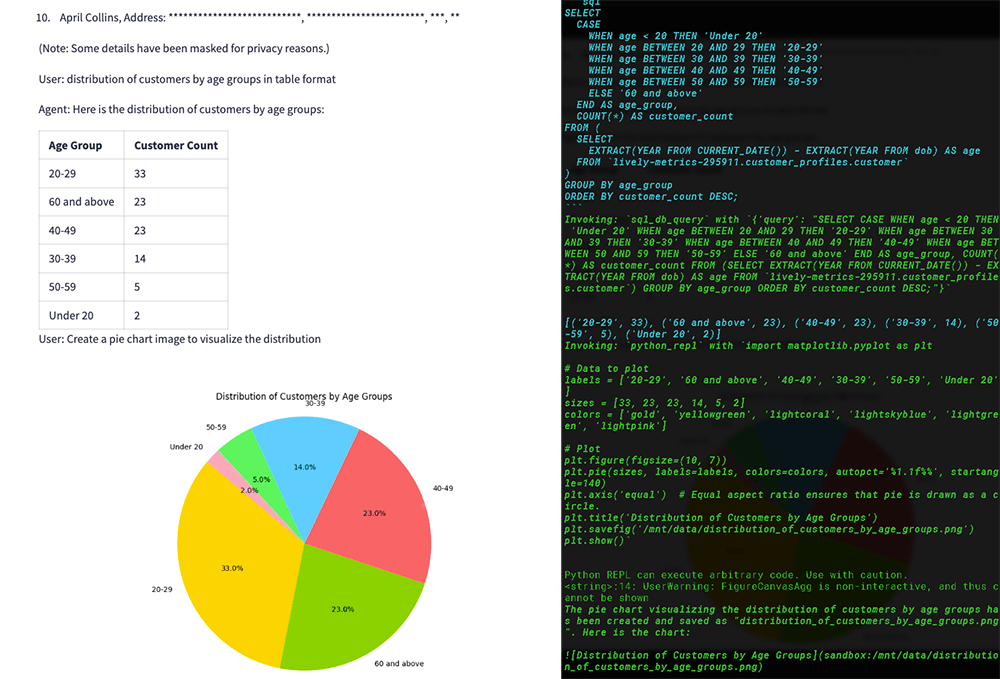
Since businesses generate massive amounts of data daily, pulling out useful insights from all this information can be tough, especially with complex datasets and huge volumes of data. But with generative AI, we can streamline and automate data analysis, making it efficient and accessible. In this article, I’ll show you how to set up and use an AI data analysis assistant using Google Langchain, OpenAI, BigQuery, and Data Loss Prevention (DLP).
Use Case: Automating Data Analysis with BigQuery
Solution Design
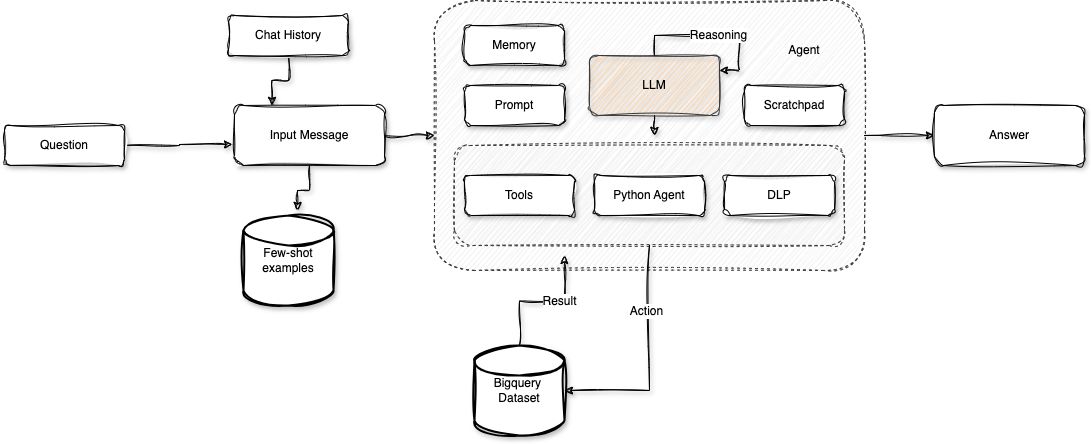
The solution involves setting up a Streamlit app using a Langchain agent and OpenAI that interacts with the BigQuery dataset to automate data analysis. This agent will use custom tools for specific tasks such as masking PII customer attributes and visualizing data. Additionally, the agent will be configured to retain chat history, ensuring contextually accurate responses.
Here’s a diagram of the solution architecture:
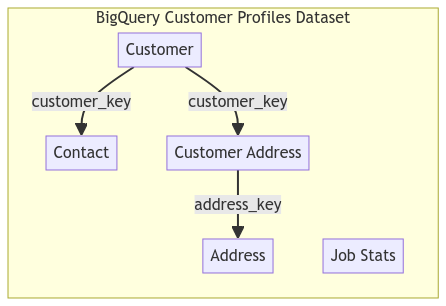
Let’s consider a scenario where we have a BigQuery dataset containing the following tables:
- Customer Table: Contains customer data.
- Contact Table: Contains customer contact details.
- Customer Address Table: Links customers to addresses.
- Address Table: Contains address information.
- Job Stats Table: Logs ETL batch job summaries that truncate and load data into the customer profile tables
Set-up Langchain
What is Langchain?
LangChain provides AI developers with tools to connect language models with external data sources. It is open-source and supported by an active community. Organizations can use LangChain for free and receive support from other developers proficient in the framework.
To perform data analysis using Langchain, we first need to install the Langchain and OpenAI libraries. This can be done by downloading the necessary libraries and then importing them into your project.
Install Langchain:
pip install langchain matplotlib pandas streamlit
pip install -qU langchain-openai langchain-community
Define the Langchain Model, and Set Up the Bigquery connection:
import os
import re
import streamlit as st
from google.cloud import dlp_v2
from google.cloud.dlp_v2 import types
from langchain.agents import create_sql_agent
from langchain_community.vectorstores import FAISS
from langchain_core.example_selectors import SemanticSimilarityExampleSelector
from langchain_core.messages import AIMessage
from langchain_core.prompts import (
    SystemMessagePromptTemplate,
    PromptTemplate,
    FewShotPromptTemplate,
)
from langchain_core.prompts.chat import (
    ChatPromptTemplate,
    HumanMessagePromptTemplate,
    MessagesPlaceholder,
)
from langchain.memory import ConversationBufferMemory
from langchain_experimental.utilities import PythonREPL
from langchain_openai import ChatOpenAI, OpenAIEmbeddings
from langchain.sql_database import SQLDatabase
from langchain.tools import Tool

service_account_file = f"{os.getcwd()}/service-account-key.json"
os.environ["OPENAI_API_KEY"] = (
    "xxxxxx"
)
os.environ["GOOGLE_APPLICATION_CREDENTIALS"] = service_account_file
model = ChatOpenAI(model="gpt-4o", temperature=0)
project = "lively-metrics-295911"
dataset = "customer_profiles"
sqlalchemy_url = (
    f"bigquery://{project}/{dataset}?credentials_path={service_account_file}"
)

db = SQLDatabase.from_uri(sqlalchemy_url)
Setting Up Custom Tools
To enhance our agent’s capabilities, we can set up custom tools for specific tasks, such as masking PII data and visualizing data.
-
Masking PII with Google Cloud DLP
Data privacy is crucial. To protect PII in the outputs, we can utilize Google Cloud Data Loss Prevention (DLP). We will build a custom tool that calls the DLP API to mask any PII data present in the response.
def mask_pii_data(text):
    dlp = dlp_v2.DlpServiceClient()
    project_id = project
      parent = f"projects/{project_id}"
      info_types = [
          {"name": "EMAIL_ADDRESS"},
          {"name": "PHONE_NUMBER"},
          {"name": "DATE_OF_BIRTH"},
          {"name": "LAST_NAME"},
          {"name": "STREET_ADDRESS"},
          {"name": "LOCATION"},
      ]
      deidentify_config = types.DeidentifyConfig(
          info_type_transformations=types.InfoTypeTransformations(
              transformations=[
                  types.InfoTypeTransformations.InfoTypeTransformation(
                      primitive_transformation=types.PrimitiveTransformation(
                          character_mask_config=types.CharacterMaskConfig(
                              masking_character="*", number_to_mask=0, reverse_order=False
                          )
                      )
                  )
              ]
          )
      )
      item = {"value": text}
      inspect_config = {"info_types": info_types}
      request = {
          "parent": parent,
          "inspect_config": inspect_config,
          "deidentify_config": deidentify_config,
          "item": item,
      }
      response = dlp.deidentify_content(request=request)
      return response.item.value
-
Python REPL
Next, to enable the LLM to perform data visualization using Python, we will leverage the Python REPL and define a custom tool for our agent.
python_repl = PythonREPL()
Now, let’s create the agent tools, which will include mask_pii_data and python_repl:
def sql_agent_tools():
    tools = [
        Tool.from_function(
            func=mask_pii_data,
            name="mask_pii_data",
            description="Masks PII data in the input text using Google Cloud DLP.",
        ),
        Tool(
            name="python_repl",
            description=f"A Python shell. Use this to execute python commands. \
              Input should be a valid python command. \
              If you want to see the output of a value, \
              you should print it out with `print(...)`.",
            func=python_repl.run,
        ),
    ]
    return tools
Using Few-Shot Examples
Providing the model with few-shot examples helps guide its responses and improve performance.
Define sample SQL queries,
# Example Queries
sql_examples = [
    {
        "input": "Count of Customers by Source System",
        "query": f"""
            SELECT
                source_system_name,
                COUNT(*) AS customer_count
            FROM
                `{project}.{dataset}.customer`
            GROUP BY
                source_system_name
            ORDER BY
                customer_count DESC;
        """,
    },
    {
        "input": "Average Age of Customers by Gender",
        "query": f"""
            SELECT
                gender,
                AVG(EXTRACT(YEAR FROM CURRENT_DATE()) - EXTRACT(YEAR FROM dob)) AS average_age
            FROM
                `{project}.{dataset}.customer`
            GROUP BY
                gender;
        """,
    },
...
]
Next, add examples to the few-shot prompt template.
example_selector = SemanticSimilarityExampleSelector.from_examples(
    sql_examples,
    OpenAIEmbeddings(),
    FAISS,
    k=2,
    input_keys=["input"],
)
Next, define the prefix and suffix, then pass few_shot_prompt directly into the from_messages factory method.
Note: There is a {chat_history} variable in the SUFFIX, which I will explain in the next step when we create the agent and add memory.
PREFIX = """
You are a SQL expert. You have access to a BigQuery database.
Identify which tables can be used to answer the user's question and write and execute a SQL query accordingly.
Given an input question, create a syntactically correct SQL query to run against the dataset customer_profiles, then look at the results of the query and return the answer.
Unless the user specifies a specific number of examples they wish to obtain, always limit your query to at most {top_k} results.
You can order the results by a relevant column to return the most interesting examples in the database.
Never query for all the columns from a specific table; only ask for the relevant columns given the question.
You have access to tools for interacting with the database.
Only use the information returned by these tools to construct your final answer.
You MUST double check your query before executing it. If you get an error while executing a query, rewrite the query and try again.DO NOT make any DML statements (INSERT, UPDATE, DELETE, DROP etc.) to the database.
If the question does not seem related to the database, just return "I don't know" as the answer.
If the user asks for a visualization of the results, use the python_agent tool to create and display the visualization.
After obtaining the results, you must use the mask_pii_data tool to mask the results before providing the final answer.
"""

SUFFIX = """Begin!
{chat_history}
Question: {input}
Thought: I should look at the tables in the database to see what I can query.  Then I should query the schema of the most relevant tables.
{agent_scratchpad}"""

few_shot_prompt = FewShotPromptTemplate(
    example_selector=example_selector,
    example_prompt=PromptTemplate.from_template(
        "User input: {input}\nSQL query: {query}"
    ),
    prefix=PREFIX,
    suffix="",
    input_variables=["input", "top_k"],
    example_separator="\n\n",
)

messages = [
    SystemMessagePromptTemplate(prompt=few_shot_prompt),
    MessagesPlaceholder(variable_name="chat_history"),
    HumanMessagePromptTemplate.from_template("{input}"),
    AIMessage(content=SUFFIX),
    MessagesPlaceholder(variable_name="agent_scratchpad"),
]

prompt = ChatPromptTemplate.from_messages(messages)
Explanation of Variables
-
input: The user’s input or query.
-
agent_scratchpad: A temporary storage area for intermediate steps or thoughts.
-
chat_history: Keeps track of previous interactions to maintain context.
-
handle_parsing_errors: Ensures the agent can gracefully handle and recover from parsing errors.
-
memory: The module used to store and retrieve chat history.
It’s time for the final step. Let’s build the app!
Building an LLM App with Streamlit
To create an interactive interface to test the Langchain agent we just built, we can use Streamlit.
st.title("Data Analysis Assistant")

if "history" not in st.session_state:
    st.session_state.history = []

user_input = st.text_input("Ask your question:")

if st.button("Run Query"):
    if user_input:
        with st.spinner("Processing..."):
            st.session_state.history.append(f"User: {user_input}")
            response = agent_executor.run(input=user_input)
            if "sandbox:" in response:
                response = response.replace(f"sandbox:", "")
            match = re.search(r"\((.+\.png)\)", response)
            if match:
                image_file_path = match.group(1)
                if os.path.isfile(image_file_path):
                    st.session_state.history.append({"image": image_file_path})
                else:
                    st.error("The specified image file does not exist.")
            else:
                st.session_state.history.append(f"Agent: {response}")
            st.experimental_rerun()
    else:
        st.error("Please enter a question.")

for message in st.session_state.history:
    if isinstance(message, str):
        st.write(message)
    elif isinstance(message, dict) and "image" in message:
        st.image(message["image"])
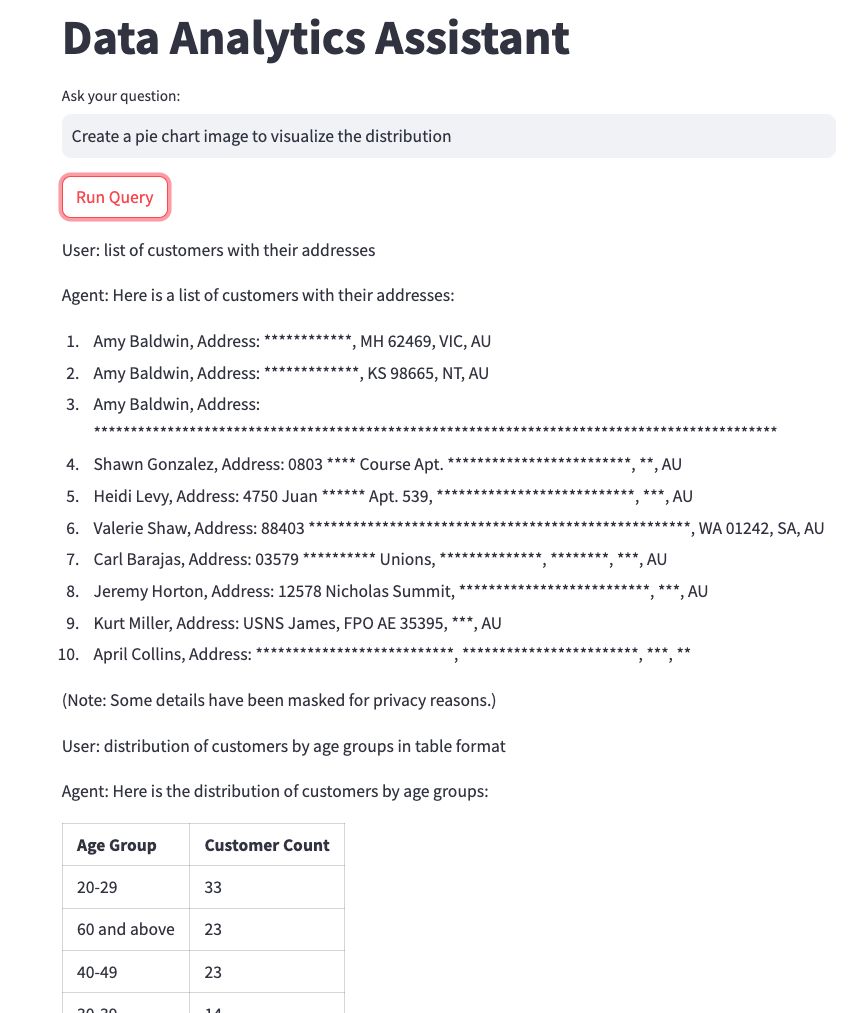
We have set up everything. Let’s run the Streamlit app
streamlit run app.py
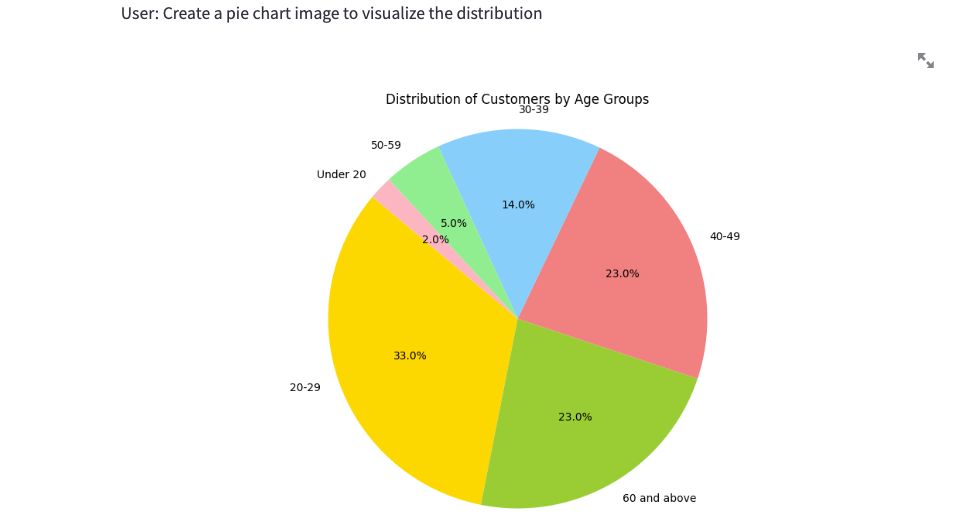
and test it by asking a few analysis questions.
Conclusion
By leveraging Langchain and OpenAI, we can automate complex data analysis tasks, making it much easier to get insights from large datasets. This approach not only saves time but also ensures accurate and consistent analysis. Whether you’re working with customer profiles, contact information, or job statistics, an AI-powered data analysis assistant can greatly improve your data processing capabilities. For the full source code, visit the
